|
This rifle started off its life as an 1893 Turkish Mauser rifle that was chambered in 8mm Mauser caliber and had the
classic straight bolt abomination that plagues these nice old rifles. While I don't have any real problems with the
8mm caliber cartridge, just like the 7mm cartridge that my 1895 Chilean Mauser was chambered in, boxer primed shells are pricey
and sometimes hard to come by. And frankly I hate using surplus ammo for the reason that I cant reload it. Sucks
that in the US there isn't a supplier for berdan primers, doesn't make sense that one can still find primer removal tools
however.
Anyway, due to that little technicality, this rifle was going to undergo some changes. The first change was going
to be the changing of the barrel. I managed to find a small ring mauser .308 barrel on Gunbroker.com for $100 so I grabbed
it fast. I took the gun and barrel to a local gunsmith and he worked his magic so now the action had a .308 barrel instead
of the 8mm Mauser barrel.
Now at this point the stock was slightly too long and the barrel channel was made for the stepped 8mm barrel and not
the tapered .308 barrel. So now at this point I looked at the front most section of the stock, between the rear barrel
band and front barrel band. This section is about a foot long. The new barrel basically came right to the end
of the stock at the front. In order to retain the "original" look of the rifle while still having a suitable amount
of the muzzle extend from the front of the stock, I only had to cut off about 5" of the stock, nothing more. I had to
do some trimming down though to accomodate the front barrel band, and just like on the 1895 rifle, I had to drill a small
hole through the front barrel band to insert a screw through the little plate that goes in the front inside the barrel band.
After cutting down the stock, I had to sand out the barrel channel to accomodate the tapered barrel. That didn't
take long with the good ole Dremel tool and some sanding wheels. I was then able to assemble the rifle with the original
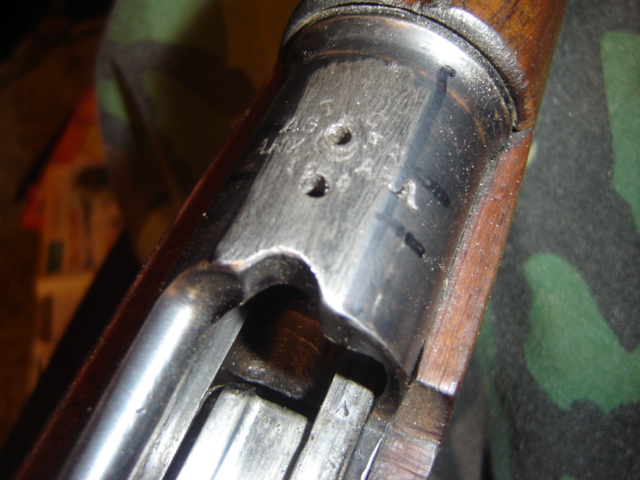
stock, including the barrel shield, since there was no rear sight to deal with. Of course there was that straight bolt
to deal with, and again, no sights whatsoever.
The next little dilemma was with the bolt, it had a problem with having a tight fit. I had to grind down little
spots on the bolt in order to help the bolt move smoothly in the receiver. After getting around that dilemma, next was
that stinkin' bolt. Another trip to Gunbroker.com and I located one of those ATI bent bolt conversion kits for $14.
Perfect, just what I was looking for. So after getting that thing, I went to work cutting the straight bolt handle off
and drilling the hole with my drill press and tapping the hole out with the bits in the kit. After that I took some
good ole JB weld and mixed up a little batch and smeared it on the stub of the bolt handle and the bent bolt mounting point
as well as on the threads of the hex keyed bolt that came with the kit. I assembled everything and made sure the handle
was straight and let it set overnight. At that point I had my bent bolt.
Next I decided to put some sights on this gun just for the sake of having them on the gun in case I wanted to use the
gun with open sights. So, again back to Gunbroker.com and I managed to find a set of sights for $10. The front
sight wasn't going to be much of a problem since all I'll have to do is trim the muzzle down enough to fit the sight, but
the rear sight was going to have to be butchered to fit it onto the tapered barrel, which will obviously be done with, you
guessed it, JB WELD!! Well after an hour of die grinding, I had the sights JB welded onto the barrel, and adjusted through
line of sight as best as I could, I'll see how they work the next day when I fire some test rounds.
After the JB weld cured, I reassembled the rifle and shot a few test rounds, and surprisingly, the sights were on target
pretty straight! I was happy that I had the completed base rifle, open sights, bent bolt and all, ready for the final
step.
|
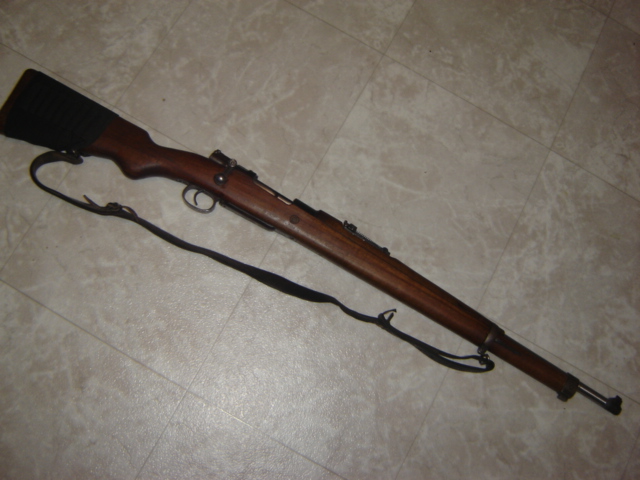
| Base Mauser with bent bolt and sight set |
Well now that I have the base rifle all done and shooting straight, I can now start the scope mounting procedure.
There aren't exactly a lot of scope mounts out there for small ring Mauser rifles so in the true art of improvisation, I improvised.
I picked up a scope rail at a local gun show, that was for a TC rifle, I think. Who knows, who cares, it was going to
be used on this Mauser. The scope rail was long enough to span the gap over the magazine well and had two bolt holes
in the front where I can secure the rail to the front of the receiver. At this point I was going to have to drill and
tap a couple of holes in the front top of the receiver in order to put the screws in place tohold the rail down.
I lined up the rail as best as possible and marked its future spot with a sharpie, including where to start the holes.
I tapped a couple of starter holes with a punch and commenced to drilling out the two holes. I then tapped the holes
and went on to the next step.
|
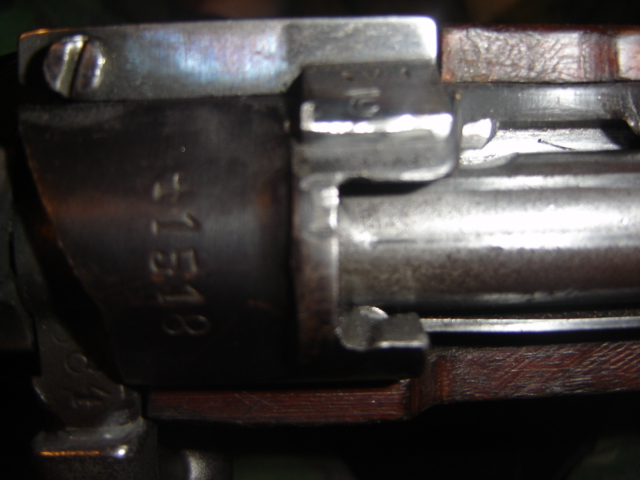
| Two holes drilled & tapped in receiver, note bluing has been sanded off |
The next thing I had to do was grind away some of the bolt release lever on the left side of the rear of the receiver.
This lever curved up over the top of the receiver and was in the way of where the scope rail will be going. Grinding
this down wasn't going to hurt anything, just make it a TAD bit harder to work the lever to remove the bolt for cleaning.
A good fingernail or a spent casing to hook into the lever will work to pull the lever out. I took the die grinder and
cut about 3/16" of the tip of the lever to make it clear the scope rail.
|
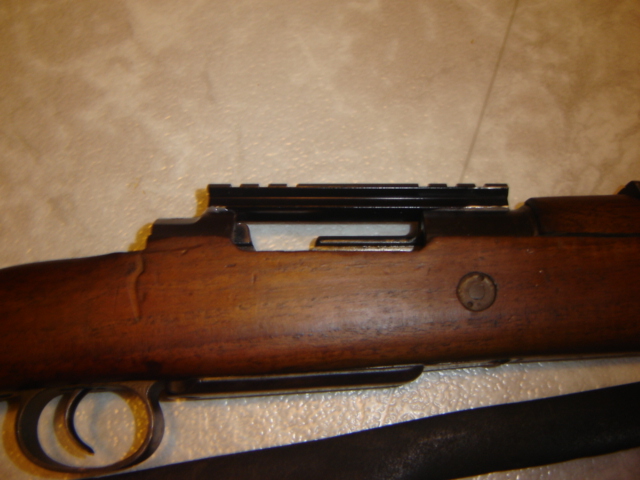
| Ground down bolt release lever on rear of receiver, note gap between stripper clip groove and lever |
Now at this point it was time for the scope rail. I ended up sanding down the spot on the rear of the receiver
right behind the stripper clip groove to get the bluing off, just like I did over the two holes. Reason for that was
to help the JB weld adhere more effectively to the metal. I applied JB weld to the bare metal in the rear and front
of the receiver and put the scope rail down on the glue then screwed the screws in place and made sure everything is straight
before setting the rifle aside to allow the JB weld to cure.
|
| Scope rail mounted on top of receiver and secured with JB weld |
Now the last thing is to mount the scope onto the rail. The scope already had rings in place from its previous
use on another rifle. After allowing the JB weld to cure overnight, I mounted the scope in place and sighted it in with
the grid boresighter. I then took the rifle out to my makeshift range and took a few test shots. At about 50 yards
(does this type of setup no real justice) the first shot landed on its mark. My shaking hands didn't allow me to land
more hits, but successive tests will probably change that, with a secure place to set the rifle. Well, for now we have
our finished hunter Mauser, all done, ready for more tests in the future.
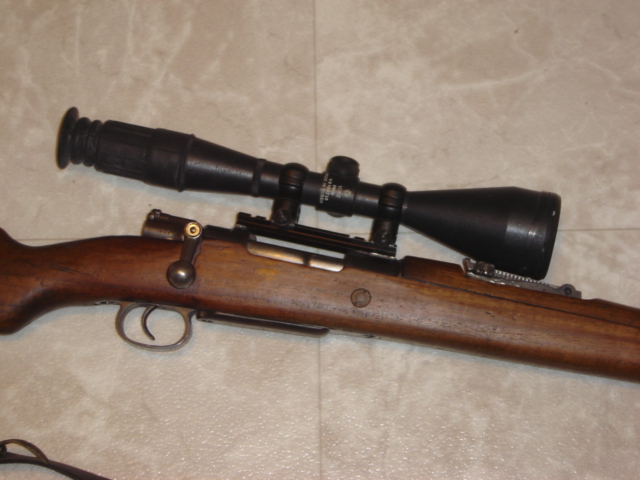
|
| Closeup of Russian long range scope mounted on rifle |
|


