|
Deciding What To Do
After making the decision to change the car around, I started hunting around for the main components for
the job - the engine and the transmission. I tried Craigslist, posting want ads for an engine and transmission to no
avail. I then started hunting Ebay with success in finding engines and transmissions, but the only problem was with
the cost of freight from one end of the country to another. I pretty much determined that in order for the whole purchase
to be economical I would have to spend only the starting price of the engine/trans. When the prices went up to $200+
I pretty much had to decline since the freight would end up being $500+.
I finally ended up joining a website called Fordsix.com. This site caters to everyone who is into
the 6 cylinder Ford engine. Needless to say, I ended up finding an engine from a guy for $100, and the freight turns
out to be less than $300. That took care of the engine.
Now one thing I immediately thought about was the idea that the engines in Fords in the 60's used a breaker
point distributor, which personally, is a pain in the ass as you have to adjust points at times. When I was working
with V8's back in Chicago, I upgraded everything to the first generation electronic ignition systems that were stock in those
engines. In the case of Fords it was the Duraspark electronic ignition system. So a trip to the junkyard netted
me a Ford Fairmont that had a 6 cylinder engine in it with the Duraspark distributor in it. Since we already have plenty
of ignition modules on hand for this ignition system, all I needed was the distributor, which I gleefully pulled from the
engine along with the wire harness plugs and a short length of wire so I can get the system hooked up when I do install
the engine. That takes care of the convenience factor with the engine.
The next thing I was trying to do was see if I could locate a bellhousing for a C4 that would couple to
a 200ci 6 cyl. This was going good for a little while until I started thinking about how there may be some discrepancies
regarding the number of splines on the transmission driveshaft for the different sized engines that are typically coupled
to the C4 tranny. I then decided that if I can find a complete transmission, then I will go that route instead.
I then took a ride to the junkyard one weekend and happened to get lucky enough to actually find a 79
Ford Fairmont with a 6 cylinder and a C4 tranny coupled to it. At first I thought about whether I should try to get
it right then and there, but at that time I was still searching for the bellhousing. After making the decision to just
get an entire tranny, I decided to go ahead and go back to the junkyard and pull that tranny from that car. I went back
with every took imaginable that might be needed to get that tranny out, hammers, saws, metric and standard tools, a big ass
flat tip screwdriver. After about 90 minutes, I managed to get the tranny pulled free from the engine and into my wheelbarrow.
Unfortunately I couldn't get the torque converter out since the engine was seized up and wouldn't turn over so I can access
the TC nuts. It was just as well anyway since the ring gear was chewed up pretty bad. I just decided that I'll
go ahead and make the TC be a new part so as to take that out of the equation when it comes to possible problems.
I currently have all of the other components lined up for purchase as they're needed, I will be needing
a fuel tank with sending unit, fuel line, motor mounts, exhaust headers and an exhaust system. The rest is already here,
scattered around in a pile of junk that was removed from the cars or just dumped there after it was no longer of any use to
us. One of the things is an aluminum performance radiator for high perf V8's, perfect for our setup. Some radiator
hose and fuel line and other tubing is also on hand to aid in setting up the cooling and fuel system on the car.
9-27-09: At this date, we got as far as acquiring the 6 cylinder engine, having to use a
Uhaul truck to pick it up. I also decided to take the C4 bellhousing from the junkyard transmission,
with which I "converted" the Mustang's old V8 C4 into a 6 cyl C4. The reason behind this was the idea that the V8 transmission
had an aluminum high capacity oil pan, plus was guaranteed to run, whereas the junkyard tranny, who knows. I also
had to acquire some other parts, like the cooling fan and pulley, a flexplate, transmission/engine adapter plate and
alternator brackets since the engine didn't come with that stuff. I also purchased a couple of motor mount brackets
from Ebay, along with a fuel tank filler tube. I still have to get a fuel tank and a complete torque converter and a
starter before I can really get everything hooked up and start the car up.
Another thing that I found while pulling the diesel engine out of the Falcon was the radiator
that was mounted in the Falcon may be a potential candidate to go in the Mustang. The radiator didn't look bad, wasn't
damaged in a way where it would be rendered useless, so now my next thing is to see if I can incorporate that radiator into
the Mustang and if so, I can go ahead and sell the aluminum radiator to acquire the extra money to get the components needed
to finish this project.
|
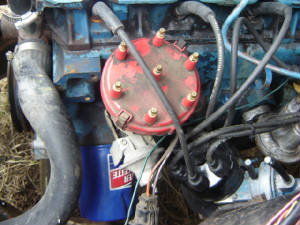
| Duraspart distributor installed in engine |
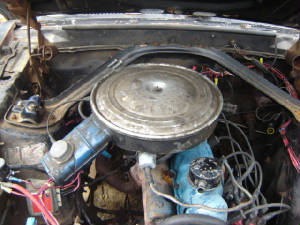
10-26-09: A month has passed and a lot has went on since then. At this point we have
the engine and transmission mounted in the car. I was able to acquire the motor mounts that bolt directly to the engine
block, which made things a lot easier than trying to locate the brackets that mount to the block and then getting the sandwich
type motor mounts.
With the engine/trans mounted, the driveshaft went in pretty fast as well since all that crap
used to be in the car in the first place. For some weird reason I did have to shorten the shifter linkage for the
trans, it just didn't seem to want to fit right. I also had to mount a different throttle cable for the 6
cyl setup. I was unable to use the water pump pulley that I got from the junkyard since it was for a different setup,
it was much too big, so I had to search for the proper pulley, since a brand new one wouldve been over $50.
As far as the exhaust is concerned, that was pieced together with segments from a couple of different
cars. At the junkyard I was able to cut the front half of a 6 cyl Ford Maverick exhaust out to use for our
setup. I also cut the rear half of a Ford Fairmont exhaust along with the axle pipe for the rest of the system.
With some cutting and welding I managed to get a rough exhaust system installed. Hopefully I won't have to come back
to the exhaust later on. More on that later.
Meanwhile I had to deal with the radiator. The aluminum radiator that I had for the Mustang
when it had the V8 didn't have a trans cooler in it so I would have to get an external trans cooler then hook all that stuff
up. We did have a stock radiator from the Falcon that did have an internal trans cooler so that went into the car.
The hose ports were on the wrong sides for the 6 cyl, so I had to fabricate extended radiator hoses to stretch over to the
ports.
Once that was all hooked up, I started to put antifreeze into the radiator only to be disappointed
when the green shit started oozing from the core. At this point I pulled the radiator and got out some silver solder
with the intent on patching the radiator, only to further find that the leak was coming from three big splits in three coolant
passages in the core.
I tried in vain to silver solder those splits but the more I heated the passages with the propane
torch the more brittle the metal got until I just said fuck it, I tossed the radiator to the side and the next day went to
Auto Zone and got a brand new radiator for $165. I put that in and filled the thing up with coolant, hooked up
the trans lines and didn't have to worry about the extended hoses, and was closer to getting the car started.
On a lighter note, I did have to do a little electrical pageantry. I ended up re-routing
the lines for the turn signals, installing extra light sockets in the taillight housings so I could do away with the experimental
dual relay setup I initially had in the dash, which had its flaws which we won't go into here. I also had to install
a round doorbell type pushbutton switch on the side of the steering column and hook it up to the solenoid to act as the starter
switch since for some reason I couldn't find the wire in the ignition switch that delivered 12v when the key was in the start
position.
It was at that time that I also hooked up the Duraspark electronic distributor and module on the
engine too. Once getting that done I did the alternator/voltage regulator.
By now I had found a water pump pulley of the proper size and managed to get it pretty quickly
(good ole ebay). I got that thing installed along with the fan and belt, so at this point all that was left was the
fuel tank.
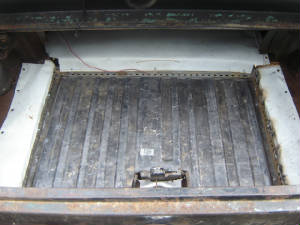
I had to weld a mounting surface for the fuel tank. To do this I used some long shelving
angle iron and jacked up the tank to the level where it would need to go, and after measuring the lengths of angle iron I
needed, went ahead and welded them up between the frame rails and to each other to form a mounting point for the fuel tank.
In went the fuel tank along with its hose and the line from the front off the engine. With all of that done,
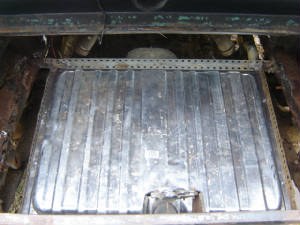
I did the trunk floors.
To do that I used some sheet metal that came from an old water heater we stripped a while back.
I measured and cut three pieces of sheet metal, and bent them in a way to allow me to screw the metal to holes drilled along
the edge of the existing trunk floor and with holes drilled in the sheet metal, be able to bolt the sheet metal to the angle
iron using the holes that were already present on those rails. While this is not perfect by any means, it does get the
job done in covering up most of the openings. I can come back on this and finish patching up the areas where theres
gaps.
Now we were ready to fire up the car. I put 5 gallons of gasoline in, oil in the engine
and trans, and charged the batteries up and started the fun process of getting the timing right while trying to start
the car for the first time. After a bit of fidgeting with the distributor I was able to finally get the timing to a
point where I got the car to start up. I did a little better timing while the engine was running to get it running pretty
smooth and at that point let the engine run for a bit.
The one thing that I did notice that made me a little uneasy was this tapping noise coming from
the engine. It almost sounded like someone wrapping on the engine with a hammer. After doing some research on
Fordsix.com's forum, my target areas for finding the source of that noise is the exhaust, the water pump and the bottom end
of the engine.
There are still a few other things I had to finish up before being able to say the car is done
and is ready to officially hit the road, like hooking up the tach, fixing that noise, clean out the car and do some test
driving.
|
| Shot of installed engine |
|
| Shot of trunk with frame for fuel tank exposed |
|
| After shot of trunk with metal panels in place around fuel tank. |
|
| Narrow glass pack muffler salvaged along with other exhaust piping for system. |
10-26-09: I wired up the tach and the temp gauge light and fired up the engine to verify that
the tach worked right, which it did. I also hooked up the transmission shift diaphragm tube, turns out I'll have to
install a terminating hose on the other nipple since the diaphragm had two nipples. Just for the hell of it I went to
take the car for another test drive down the driveway, turned out that the tranny didn't shift, so I will need to put that
other hose in place with a plug.
Unfortunately on the way back up to the driveway the engine sputtered and died. It started
back up for a fast second then died again. After a couple more attempts it wouldn't even sputter. I sprayed some
ether in the carb and it did start up for a fast half second again but still dead, which told me that the damned thing wasn't
getting fuel. The tank had 5 gallons of fuel in there, which it couldn't have gone through that fast, so the only thing
I can see is that the sending unit is not straight up and down like its supposed to be and the pickup isn't down far enough
to pick up the fuel. So at this point I will have to pull the tank, again.
11-12-09: Well at this point I did manage to find out that the fuel problem was caused in
part by a crappy fuel pump. I did end up putting a 1x2 board on the back side of the fuel tank to lift the rear end
up so it would be more level and bring the front end down some more, hopefully it doesn't throw the fuel sender and gauge
off too much, hell right now I don't even think the gauge is working right anyway.
But even after doing that and putting plenty of fuel in the tank, I still had issues with the carb
going dry. At this point I hooked up the electric pump I had from the abandoned Falcon diesel project and hooked it
up, and poof, the motor came to life again. So at this point I installed the pump in a semi-permanent manner so it won't
come loose or get into anything, at least until I get another mechanical pump.
I also got the tapping sound fixed in the engine too. I pulled the oil pan (which sucked like
hell) and immediately saw what was going on, I saw the scrape on the pan where it was dented in, caused by the connecting
rod smacking it during every revolution. At that point I took a hammer and tapped out the dent, but in the process opened
up a couple of hairline cracks where the gouges were made. I mixed up some JB stick weld and stuck it over the cracks,
and to this day the shit held. Needless to say, I will be hunting down another oil pan.
With the fuel and oil pan problems out of the way, I did more testing, mainly to get the transmission
straight. At first I had problems getting the tranny to shift into 2nd, then after topping the tranny off good, I was
able to get it to shift into 2nd while going up and down the driveway. Unfortunately I couldn't get it to go into 3rd
when I did drive down to the main road. I checked the vacuum modulator, adjusted the bands, even changed the obviously
waterlogged tranny oil, all to no avail, the tranny still wouldn't shift into 3rd, in fact, the damned thing is now stuck
in 2nd. It will go into reverse when you shift into that gear, but when shifted into drive, its in 2nd and stuck in
2nd. At this point I figured that the water that got into the tranny caused some damage that I may not be able to recover
from, so at this point we're gonna hit up the junkyard for another tranny that will hopefully function for us.
11-28-09: After our foray into the junkyard for a replacement transmission
for the uncooperative C4, we came back with a C3 from an 83 Fairmont. with a little modification to the tranny crossmember,
I got the tranny in relatively easily. I did have to change the tranny yoke since there were differences, but that was
no biggie. After filling everything up and getting ready to go, I started the car, and came to find out the first thing,
the tranny didn't have a "park" setting. Damn.
I then took the car for a test drive, the car seemed to go into 2nd just fine, and it appeared or
felt that it was going into 3rd, but the car was still going kind of slow for having gone into high gear. After a couple
more tests, I determined that the car was indeed going into 3rd, but the tranny was slipping in that gear. I could manage
to get the car up to 40+mph with effort, but the whole time the engine would be revving well over 2k rpm, which isn't right,
even for the 6 cyl engine. Even when holding the speed at 40-50, the thing was still revving, trying to maintain that
speed. Clearly this tranny was worn out, this was a tranny that probably seen a LOT of highway use.
At this point I said fuck it and decided to just get a reverse manual valve body for the C4 and
put that tranny back in and just shift the thing manually. I won't have to worry about a clutch, but I won't have to
worry about trying to find another functional tranny, or rebuilding the C3, or trying to get a fresh stock valve body for
the C4, which wasn't too much cheaper than the manual valve body. With future performance mods pending, the manual valve
body would be a welcome addition anyway.
At this point, we're waiting for the valve body to come, which we got off of Ebay, and I managed
to drop the C3 in 90 minutes the night before Thanksgiving when I got home from the job.
Other than that, I also managed to correct a few electrical issues on the car, like the flip flopped
turn indicator lights in the gauge panel, which now flash right when the indicator level is activated. Also I wired
up the terminal block for the engine electrical system to a toggle switch under the dash, so when I just want the radio on,
I can throw the switch to turn off the electric fuel pump and ignition and charging systems, since the ignition switch is
wired up to turn everything on in either direction, don't ask.
At this point the tranny is the only real thing keeping the Mustang from hitting the road.
Once the tranny gets installed, and hopefully works, I should be able to really put the car through its paces. The only
other things I really need to look at are the proper operation of the fuel gauge and the electrical connections. The
last thing I need while driving is having some bullshit electrical anomaly due to a shitty connection that worked its way
loose.
12-20-09: Well at this point the C4 is back in the car and tests out perfectly with the reverse
manual valve body. It shifts through all of the gears without any problems and drives up to fairly decent speeds without
any problems. Right now I couldn't get an accurate speed reading due to the probability of the speedometer cable being
bad. The speedometer needle would bounce up and down, failing to give any kind of accurate reading. Since the
cable did come from the junkyard, its only expected that the cable may be bad.
I also checked the fuel gauge for proper, or at least somewhat reliable operation, since the gauge
read full all the time. I started the car and let it run while I drained fuel from the tank. Once the tank started
draining very slow, indicating that it was close to being "empty", the gauge started going down past the halfway mark, slowly
tapering off below the 1/4 full mark. I finally concluded that this is close enough, basically when the gauge hits the
halfway point, I will need to start thinking about putting fuel in the tank. The test was done with only 7 gallons of
fuel in the tank so obviously the gauge is off quite a bit. At least for now its working enough so that I can tell what
my fuel levels are approximately at.
The only other things that need to be done to the car is the hookup of the heater core hoses so
we can have some heat in the car at least, plus I have to patch up a couple of holes in the driver's side floor, not rust
holes but a couple of factory holes.
Another minor yet somewhat annoying issue is the lack of a smooth throttle response; appears that
the distributor isn't getting a good vacuum for the ignition advance diaphragm. When I test drive the car, I have to
lightly depress the accelerator and once moving I can further depress the accelerator to continue ramping up in speed.
I tried everything I can think of to correct this problem, I may try to work with advancing the timing and doing some more
tuning with the carburetor. My next move will be to try and fabricate a 2 bbl intake manifold from a 1bbl intake, my
theory is that the extra airflow from a 2bbl intake may improve on the vacuum issue, who knows, we'll see how this all plays
out.
3-5-10: We hadn't done much of anything on the Mustang since the last entry, other than an
occasional starting to let the engine loosen up some more and make sure there are no other gremlins hiding inside. One
of the things that we did manage to do today however was install a new Mach 1 carpet in the car so as to improve the look
of the interior. The carpet has red pads on the spots where one would place their feet, it actually looks pretty good.
In order to install the carpet we had to pull the seats and disassemble some of the side panels, then after placing the carpet
down, trim the carpet to better fit the many curves and bends that were present.
Overall it didn't really take too long to do this, and now with the carpet in, the inside will be
a bit more pleasant to look at, maybe a wee bit quieter and/or cooler or warmer (depending on the climate), and will
help preserve the metal floor a little better as our wet muddy feet will not keep leaving moisture on the floor. The
next thing that will be getting done on the car will be installing an aftermarket shifter, as the original one inside tends
to be flaky and not engage at certain points, so rather than keep playing with this flawed shifter, we figured we would just
put a better shifter in. Another thing that will also be getting done in the very near future will be restoring the
gauge panel to its original state by installing the printed circuit board on the back of the gauges, where we can use the
plug that went in the back of the panel to connect the gauges and indicator lights to the car's electrical system. Right
now the gauges are kind of hooked up in a Mickey Mouse manner, which may or may not last or hold up for too long with all
of the bumping around that the car would typically do on these country roads.
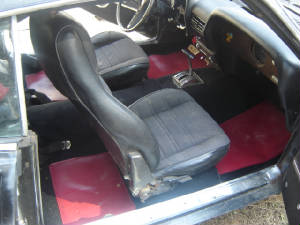
|
| Shot of interior with carpet in place |
4-7-10: At this point, since the last time we worked on the car, we managed to get a few other
things done on it. One of the things we did was install this printed circuit board on the back of the gauge panel, where
the terminals for all of the gauges connect to, along with these small light sockets that twist and lock in place on the PCB
and the shell of the gauge panel. This was an improvement from the bundle of wires that we ran to the rear of the gauge
panel to connect all of the gauges and the jerry rigged light sockets up to. With the PCB in place, the chances of a
catastrophic short occuring due to crappy wire connections is lessened greatly, especially since the wiring was simplified
by the use of a multi wire plug that plugs into the PCB, using the shell of the gauge panel for support. All of the
wires are soldered to the leads on the plug, making for a good solid set of connections that won't come loose or short out
on anything.
The next thing that was done was the installation of a "racing/performance" aftermarket shifter.
This is one of those ratcheting B&M shifters with the flashy chrome to them. Since the transmission is set up with
a reverse manual valve body and the stock shifter has been flaky to say the least, I figured that with the installation of
one of these aftermarket shifters, it would make for a smoother shifting of the tranny, without the risk of the linkage coming
loose or otherwise failing, causing the driver to be unable to shift the car out of the setting that it may be stuck in.
With the shifter installed, we also installed the center console around the shifter, since the shifter
had to be mounted to a position that was behind the hole where the stock shifter went, so the next move will be to actually
cut a sheet metal plate that will fit in the opening on the console where the shifter is resting within, so the setup will
at least look neater and not so "country".
With that, we did take the car out for several drives. Like we usually did, we drove "around
the block" so to speak, in the immediate area near the house, which the round trip still amounted to probably four miles
give or take, all the way back around to the house. Then on one occasion, I took the car to town, ran an errand while
I was at it, then drove back, taking the long way, probably racking in a run of well over 25 miles, without a single problem
from the car at all. Everything ran fine, temperature was low, engine ran smooth, car shifted and got up to speed pretty
good, the only thing is, we still don't really know what speed the car is traveling at, since the speedometer, is inaccurate,
and doesn't really register above 40 mph, the needle just bounces, like something is slipping. Thats one of those things
that we will have to work on, but for all intents, the car is pretty much ready to hit the road now.

|
| B&M shifter installed |
5-19-10:
At this point I had to crawl under the car to do some welding on the left rear frame rail behind
the axle, as the metal was rusted to a point of falling apart upon agitation by me and my trusty hammer. I used some flat steel to literally make another frame rail, cutting and trimming the metal to fit around the spring
shackle and fit the contours of the old frame rail. With a little time, I had a patched up frame rail that took my jumping
on the rear end of the car without any give. Of course the only real test will be driving the car on the road and letting
the stronger forces of the crappy roads test the improvised frame rail. The other side will probably need to get patched
up eventually as well due to its varying level of decay.
Another thing that was done was the adding of seatbelts to the rear. The male side of both
belts in the rear were present but the female buckle on one side was nothing but a short strap of belt, while the other buckle
was completely gone due to the bolt thread being gone after a past patching of the floor where the section of the floor holding
the belt bolt hole was removed. A trip to the junkyard netted a female buckle pair that just so happened to fit the
male buckles from our car. What I ended up doing so as to save me the trouble of having to weld a nut over a drilled
hole in the floor was to take the two belts and bolt them to the one side that still had a bolt hole present. Before
putting the bottom part of the rear seat back in place I strung both female buckles through the holes in the seat, having
to adjust all the way out the one buckle that had to stretch across the driveshaft hump on the floor. A self test
of the stretched belt proved that it was still plenty long enough to fasten a large person in the seat as I was able to buckle
myself in while still having some slack in the belt.
At this point, we will probably be putting the car on the road very soon, we're just waiting for
a few things to pass first before concentrating our effort on that act, so just in case something happens, we won't be overwhelmed
with the task of either recovering the car ourselves or funding a tow truck. Of course the car is still far from done,
we still have plenty of body work to do.
5-31-10: At this point, we managed to drive the car a few more times for testing purposes,
as well as to try and weed out some more bugs. One of the bugs that was discovered was that one particular circuit for
some odd reason or another kept causing fuses to "partially" fail. This was found when the car didn't want to start
easily, then when it was started, would stall out. The fuses may just be crappy low quality fuses, but to make a long
story short, I ended up just wiring an auto reset circuit breaker as a bypass for the circuit with the questionable fuse.
Once that problem was taken care of, I then decided that we had to have a working ammeter on the
car as well. After some past attempts at trying to get the stock ammeter to work, I tried to make one more attempt,
again to no avail. Finally a trip to Harbor Freight landed us an internal ammeter for only $6. I removed the stock
ammeter from the dash panel then took the face from the old gauge, cut a large hole in it that would accomodate the new ammeter,
installed the new ammeter into the modified stock face and measured the back frame for the new holes that had to be cut for
the terminals and mounting studs. With everything measured and cut and assembled, I was able to install the new ammeter
back into the dash panel. With the dash panel hooked back up, it was then time to get the final wiring hooked up.
It took a couple of attempts to get the ammeter wired right. The first time I had it set up
where the alternator was recharging and was showing a discharge. I then realized that the alternator had to be wired
up on the load side of the ammeter in order to show the reverse direction of current flow when the alternator is charging.
This did work, so now the old Mustang has a working ammeter, we can now monitor the charge status of the vehicle. At
this point, its now time to put the car on the road.
6-20-10:
Well folks, we really had one hell of a let down this time with the old mustang. We were very
very close to having the car on the road full time. So close that we were actually getting ready to drive off one Friday
to do our weekend runs, when I attempted to shift into reverse, only to find out the damned transmission wasn't going into
reverse. Well this fucking sucks.
For the next week afterward, I slid under the car to check some basic things like the linkages,
oil levels, and band adjustments to no avail. Next a trip to an online forum advised me to check the reverse/low servo
piston to see if it was stuck. After checking that out, I did find that it was kind of sticky and not really free moving,
so off to the junkyard we went.
We did get lucky and find a replacement servo in another C4 tranny so I removed it and we returned
home. The next day I installed the servo, again to no avail, the damned tranny still wouldn't go in reverse. At
this point I pulled the pan to look at the innards of the tranny. I did find pieces of the reverse drum band friction
material in the pan so I know that was on its way out, but near as I know shouldn't stop the thing from at least trying to
go into reverse. After looking at the adjustment of the bands from the inside and cleaning out the band bits, I reassembled
the tranny and tried again; nothing, fuck.
I pulled the pan again and removed the valve body this time to see if there may have been something
that might've kept the servo from getting high pressure oil to activate it. The filter did have a lot of band crap in
it, making me think that the stuff was impeding the free flow of oil into the upper parts of the tranny. Other than
that I didn't find anything else out of place near as I can see. I reassembled the tranny and tried again; nothing.
At this point, I'm totally frustrated, and pissed off with auto trannies in general. We even
discussed the possibilities of "upgrading" to a standard tranny, which surprisingly I found out on the same forum would be
a good option as there is a 4 speed overdrive manual tranny called the SROD, that was used on the 200 6cyl engines.
If that wasn't an option due to the lack of availability of said tranny, then I seen conversion kits that utilized particular
manual tranny bell housings from 60's/70's Fords and allowed one to couple a newer T-5 5spd manual tranny to the 200 6 cyl.
Of course T-5's are about as common as cockroaches in the 80's and 90's Ford community. This would give me the fuel
efficient overdrive tranny that I have sought after for the 6 cyl engine, which should make the car even more fuel efficient,
even with the 1bbl carb fed engine.
The only thing is, with money obligations going elsewhere, such an undertaking may have to wait
as it would cost some money for the kit, a compatible bell housing, and a junkyard T-5, let alone a new driveshaft.
So my only other option right now would be to just go spend $50-$70 for a C4 overhaul kit and either take the time to do the
work myself, or see how much it costs for someone else to do the overhaul and have them do it, freeing me to continue to work
on the other stuff around the homestead, leaving me to only have to install the fresh tranny back into the car (which doesn't
really take too long actually).
So to sum everything up, the damned car is a paperweight once again, as I wouldn't really know if
one of the forward gears is also missing since the reverse gear is non-functional. Either way, I'm not driving a car
w/o reverse, damn that. I'm just going to have to suck it up and get the tranny problem addressed while I try to get
the other cars up.
9-18-10:
At this point I managed to overhaul the C4 tranny, replacing the stripped low/reverse drum in order
to restore operation to the thing. We took the car for a couple of test drives, then actually drove to Jackson with
the thing with some moderate success. The carburetor started getting to a point where the thing was starving for fuel
at random times and even stalled on occasion, but luckily we were able to make it back home.
After a carb overhaul, the car was back to running smooth again. Another test run was made
into Jackson, this time with some highway driving mixed in with speeds upwards of 70 mph for sustained periods of time.
Everything went pretty well actually, with the exception of a light hint of smoke from the tranny, which I believe was a combination
of oil leaking from the oil pan onto the exhaust pipe, and probably some more breaking in of the tranny. C4's tend to
just be damned near impossible to completely seal up for some reason.
Another thing that I did was change the connecting rod bearings because during the first test into
Jackson, the engine was knocking real good when the engine warmed up, especially upon restarting. Sure enough I found
one of the pistons had a bearing set that was completely worn down to the copper. Hopefully things will last a good
long time before the engine needs a complete overhaul.
While the car is pretty much ready for some more driving, there is one other thing that was discovered
to be an issue, not a critical issue but an issue nonetheless. The gauge panel is missing a little box that apparently
plays a big role in how the gauges operate. The little box turns out to be a voltage regulator, regulating the
gauges' voltage down to some lower voltage. In our case, the gauges are getting the full 12v, which causes the oil and
fuel gauges to act erratic.
The fuel gauge is unpredictable for the most part, once it gets to the last 1/3 to 1/4 tank, the
gauge is all over the place. The oil pressure gauge goes all the way to the high end when there's good pressure.
On one end, I could say that I just keep the fuel tank topped off, and as soon as the gauge hits the 1/2 tank mark, fill it
up, no questions asked. If the oil pressure gauge starts moving away from the right end too much, then its time to see
what's going on.
3-15-11: Its been 6 months since the last entry on the Mustang and much has went on since
then. First of all, I did replace the little box for the gauge panel, which was actually a voltage regulator.
The fuel gauge works for the most part, the oil pressure gauge is pretty well shot though. The fuel gauge will flake
out though around 1/3 to 1/2 full though, so it will probably need to be replaced as well. The gauges are another issue
though.
Another thing I did was change the alternators around on the car too. While I did have the
old charging system with the old alternator hooked up, I had a problem with the system where the alternator was constantly
dumping juice into the battery. After blowing a battery I finally said screw it and looked for a better alternative.
That alternative was to replace the old school alternator and external regulator with a newer alternator that has an internal
regulator. I chose the 3G alternator that is used in the middle to late 90's Ford cars. The alternators removed
from the 4.6L engines in T-Birds and Mustangs will fit on the mounts of the old school Mustang just fine. The only thing
is that I had to change the pulleys around to match up to the V belt. That and a hook up of a couple of wires and
the alternator is online. After that, I never looked back, that alternator was one of the best conversions I did on
that car.
As far as the tranny is concerned, I did have one episode where we lost reverse. It later
turned out to be the low/reverse drum, the splines were over half stripped, so when the tranny was put into gear, it didn't
have anything to grab onto. Ok then, so after luckily finding a replacement drum and reassembling the tranny, all was
well once again. Until the rear seal crapped out and the oil pump somehow loosened up.
I had to drop the tranny again to tighten the oil pump bolts so the damned thing wouldn't leak anymore
from the front. I ended up having to take the driveshaft to be shortened by a couple of inches since the yoke was scrubbing
the seal which tore it up fast. After addressing those problems, we were back on the road again. Then....
The bolts on the bellhousing loosened up a little bit, causing the torque converter to make some
really shitty noises as it scraped against the spacer plate and starter body. That was a quick fix. But then....
The tranny started getting to a point where the tranny would slip when put in reverse after the
drivetrain was nice and warmed up. It would be fine when cold, but when hot, I would have to rev the thing to make it
move slowly in reverse. After going through this for a good week, I went ahead and tightened the band. This worked,
for about a week. Then it was back to the same shit again. Finally one night after returning home, I tried putting
the thing in reverse and it wouldn't do a damned thing. At that point I said fuck it, I'm going to put a stick shift
in this car. I'm tired of messing with this troubling automatic.
I managed to acquire a 3 spd tranny for the 200 6 cylinder off of ebay for the total of $250 with
the freight. While waiting for that to come, a guy about 80 miles from us had 3 of these 3 spd trannies, one of which
had the 6 cyl bell housing on it, along with pedals, clutch forks, shifters, boots, linkages, etc for $100. Of course
I had to jump on this deal. So with that, I had to get a flywheel, clutch disc/pressure plate, and some other hardware
to help complete this job. This is where it starts to get sticky.
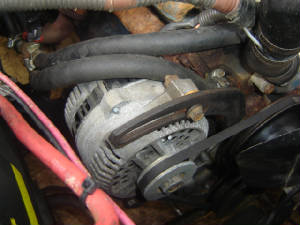
|
| Updated 3G alternator installed on car |
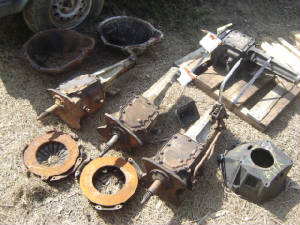
|
| Batch of manual tranny hardware acquired for cheap |
10-8-12:
Well its been over a year since the last entry for this project, as well as others. The main reason behind it is
due to the idea that I've been working on several projects, all at the same time, for the whole time and still am. The
last time we visited the Mustang project, I was planning on installing a 3 spd manual tranny into the car after having countless
problems with the C4 auto tranny.
Well that batch of trannies and parts that I bought from the guy in MS turned out to have almost everything needed to
do the job. I even had the shifter assembly to bolt to the tranny. The tranny I got off of ebay turned out to
be one I couldn't use, at least not with the stuff I had. The tranny didn't have the mounting holes for the shifter
assembly, while the trannies I got in MS did. So I ended up using the best tranny out of the batch.
The main thing that was holding me back from doing the job in its entirety was the lack of a clutch and flywheel.
Well, not knowing a lot about these 3 spd trannies, I ended up getting an 8" flywheel from a guy on a Mustang website that
caters to 6 cyl Ford engine vehicles. Its a flywheel that uses an 8" clutch actually. I also got a clutch from
another site as well to accomodate the clutch. I got as far as bolting the flywheel and clutch assembly to the engine
and upon trying to mate the tranny to the engine, found out that there was a difference in 3 spds thru the late 60's.
From the early 60's up til 67 or 68, the 3 spd trannies used were a smaller, weaker one that was specifically for the
6 cyl engines, using the 8 inch flywheel/clutch. After that point, Ford upgraded to a beefier 3 spd that could be used
with both the 6 cyl engines and V8's. That newer tranny used a flywheel with a 9" clutch. The 9 inch flywheel
is a flat flywheel while the 8" flywheel has a cavity to accomodate a recessed clutch, no interchange whatsoever.
Well after a couple of choice words, I went back to ebay, and lo and behold, I actually found a 9" clutch for dirt cheap,
so of course I jumped on it like a tick on a dog. With that I had to acquire the clutch set as well, which wasnt
too bad, just cost a couple of bucks to get since there were understandably no used clutch pressure plates around.
With the parts in hand, I was finally able to assemble the whole powertrain together. I didnt even have to change
driveshafts either. I had to do a little trickery with the Z bar for the clutch pedal and associated rods going to the
fork. I literally had to fabricate my own version of all these parts, cutting and re-welding the rod going from the
clutch pedal to the Z bar. I was pretty much through with trying to find the "right" parts to complete this shit and
just wanted to get the damned car on the road already.
One other thing that I had to do was get the shifter set up. Since the tranny with the integral shifter (bolted
to the tranny) wasn't the 3 spd that was used on the mustang, nothing sat right. The mustangs used a remotely mounted
shifter. I ended up having to cut the hole in the center hump to accomodate the new position of the shifter, and bolting
down a metal patch over the section of the hole that wasn't needed. Afterward, to help make things look more "professional",
I retained the Mach 1 center console, but removed the flat section in the center of the assembly and replaced it with a piece
of plywood cut to fit. I cut a small opening for the shifter to poke up through and bolted down the shifter boot to
the plywood board. I spray painted the board black so it matches the rest of the center console.
Well after getting everything hooked up, which also included a new starter since the flywheels being different along
with the bellhousings, required different starters from the automatic rigs, I fired the car up and put the car into reverse,
at least what I thought was reverse.
The funny thing with the 3 spd tranny from the late 60s/early 70s, is that the shift pattern is WAY different than what
a normal tranny uses. The reverse gear is in the upper left, straight down is 1st, upper right is 2nd and lower right
is 3rd. It took me a couple seconds but after figuring it out, I had the car off the ramps and ready for some test driving.
The only "annoying" flaw that I notice from the whole rig, even to this day, is when I start off in 1st. If I don't
rev the engine enough and let off the clutchjust right, the whole car will shudder until everything is rotating fast enough
to move forward. If I let off the clutch like Im going to accelerate at a faster rate, such as getting onto the highway,
I can usually get the car off without the shuddering. This of course means that city driving sucks ass, with the stop
and go from light to light, I'm shuddering quite a bit. Its a minor inconvenience, but with this car I don't do a lot
of city driving, and unlike city driving in Chicago, city driving in MS isn't really near as bad, especially if you do your
driving at certain times of the day and avoid certain areas.
I've been driving the car for a good year so far with the manual rig and about the only problem that I had was pertaining
to the starter getting a stripped drive gear which I was able to swap with the drive gear from a core starter I had laying
around. That whole problem came about due to excessive cranking from a failing fuel pump. After replacing
the starter, sometime later on the pump finally got to a point where it died. Luckily I had a spare pump in the
trunk with my other parts and tools so that problem was quickly taken care of.
Well as usual with these projects, this isn't the end of the line. I discovered that there are conversion kits
that allow one to mate a T-5 manual tranny to a 6 cylinder engine using the bellhousing from the old 3 spd tranny. The
hardware does cost, of course, and it'll mean that I'll have to have some driveshaft work done most likely, at least the yoke
will need replacing, along with the tranny mount. I'll probably cut up and weld onto the existing mount to allow it
to accomodate the T-5, but for all intents, I have to acquire everything this time before I take on this project, I don't
want a repeat of the conversion from the auto tranny to the manual tranny. Plus, I will wait til I have another fuel
saver vehicle road ready so while this car is down, I'll still be able to drive around w/o going broke. This isn't a
critical project but it is one that will be considered very soon.
10-7-13:
Well its been a year since the last entry on this project, which is still an ongoing project, but one that is being put
to use in the process. The only negatives in this project is that I hadn't had a chance to really start doing any major
body work, and in the meanwhile the body has suffered more so, partly on the count of a few deer strikes. What I'm really
waiting for is to get a couple of the other vehicles into play where it'll allow me to mothball this vehicle where I can start
doing body work to it. Of course I'll also have to have some money available at the time so I can buy the panels and
be able to get the work done in a short amount of time versus having the car set up for a year while I try to save up money
to get the body panels needed for the job.
The other negatives that have affected this vehicle is the deterioration of the frame and other structural areas of the
car as time progresses, partly on the count of riding on some of these crappy roads between the house and my job as well as
the city in general.
Not to long ago I had to do some patching to the left front frame rail right where the steering gearbox bolts to, on
the count of some fractures and general rot that allowed the gearbox to actually move some when the steering wheel was turned.
Another issue in the same area involved the shock tower having a little damage where the upper control arm was able to shift
in a manner that all but killed the car's handling. On both occasions I had to put the car down for a couple of days
while I pulled out all sorts of flat steel and other scrap metal to cut and weld up the patches and reinforcements to make
the repairs to the afformentioned areas of the vehicle in order to restore the solidity of the car's structural integrity.
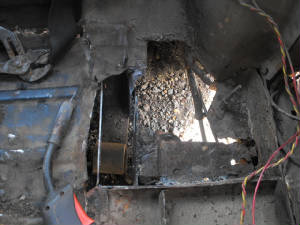
The most recent issue with the car's framework was when the torque box, if I'm correct of the terminology, completely
gave way on the left side, allowing the front shackle of the leaf spring to break through what was left of the floor and rest
inside the interior of the vehicle, which also resulted in the rear of the car dragging its ass like it had a ton of concrete
in the trunk.
That was a "fun" project due to the fact that I was going to have to jack the car up enough to drop the leaf spring,
while not having anywhere in the rear to actually jack the car up, then still fabricate a new framework to go in that area
after I cut away the damaged rusty metal.
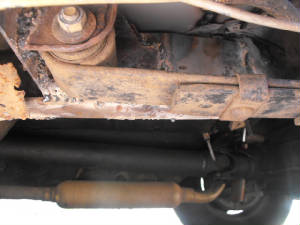
I was able to jack the car up from the rear most section of the front frame rail on both sides, which was sufficient
to get the car up enough that I was able to disconnect the spring mount that attaches the spring to the rear end. At
that point I spent time whittling away at the area, removing metal until I had a wide open area, a raw clean slate to work
on. I also had to grind on the rusty metal to expose the raw metal so my welds can take a better hold as well.
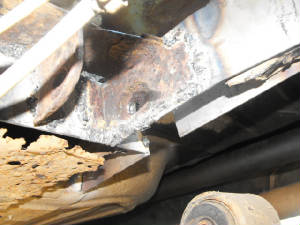
What I ended up doing was recycling the leaf spring mounting bracket that was attached to the side of the frame rail,
removing as much of the bad metal as I can, then welding up 3" flat steel on the right side of the bracket and on the front,
then drilling the hole through the flat stock to accomodate the large bolt that will be used to mount the leaf spring, then
welding it in place of the old frame rail section and the torque box. I also welded another 3" flat stock section to
the other side of the frame rail then cut out a section of the metal to create an opening to allow the bolt to pass through
the frame rail to go into the spring bracket on the other side. It's a goofy design that Ford created that was flawed
from the start but I had to work around those design parameters. Finally I completed that with a piece of 2" flat
stock on the bottom to create a new section of frame rail, attached to the old stub of a frame rail.
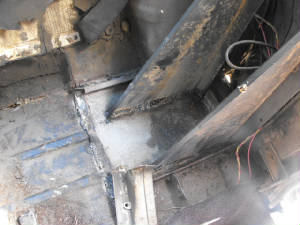
With the spring shackle/bracket and new frame rail mounted in place, I had to install a piece of sheet metal to serve
as a new section of floor to replace all that had rotted and had to be cut out. Some scrap office divider metal was
used for this purpose as the sheel metal was pretty thick to start with. After cutting and fitting the sheet metal in
place and welding it in, I then took a couple of triangular pieces of sheet metal that have bent edges to add a lot of rigidity
to the overall piece, and welded them to the top of the sheet metal floor patch, then welded the tops of the triangles to
the upper structural support of the rear quarter panel. This effectively created a bracing that would stop any upward
movement of the whole spring shackle/frame rail section. This will all be covered up by the interior side panel that
will go back in place.
There's still some more patching that has to be done, mainly on the rear floors, where more sheet metal will be used
to fill those areas in. I did to some minor patching in the trunk area around where the fuel tank mounts in as well
as a couple of vertical supports at the rear most section of the trunk plus a couple of small areas of the trunk floor as
these areas broke free some, allowing the sections of the trunk floor to shift and move around, creating a lot of noise whenever
the car hit rough roads. Also it helped at more integrity to the opening that held the fuel tank, since a tank holding
15 gallons of fuel isn't exactly feather light.
As can be seen, the work continues on the Mustang, probably will never end for all intents, but then again, that would
make life with the car pretty boring if I wasn't doing anything with it (yeah right). In the end its a labor of love.
More to come.
|
| Cut out area around torque box exposing the rusted structural members prior to patching |
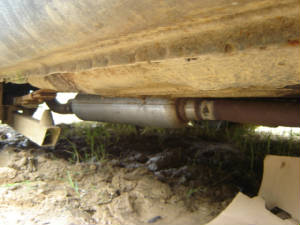
|
| Patched frame rail around front spring mount |
|
| Spring secured to new frame patch |
|
| Internal braces welded in place to further support torque box |
|